Body Work Dilemma

skullandbones

New member
I have a fiberglass roadster that I'm doing bodywork on. So far I have covered the parting lines with filler after some fiberglass resin spot repairs. At first, I did a minimal coating of filler and primed with hot rod black primer. After registering I've been driving a lot. So I finally broke down and started doing the body work . This time I focused on getting the curves right (no flats on this cobra body). But I got to a point where I couldn't tell if I was done. So I painted the whole thing with black lacquer. I know I probably should have gone with the guide coat but I was not familiar with the use of it and was afraid of wasting my time learning. So that's where I am now. I hope I haven't "painted myself into a corner" so to speak.

I had a dual purpose for painting. One of course, was to show the defect (black really does that). The other reason was I was tired of driving around in primer. It does actually look a lot better black and shiny. When you get close, that's when the flaws pop out!

Can I continue on this pathway? My plan is to work on a corner at a time and then repaint to verify the result. I was thinking that I might use the guide coat as a final check before painting again. I am using lacquer so it will spot in pretty easily. So I can continue with somewhat of a paint job until the complete body is near perfect. At the end of this, hopefully before the end of summer, I should have a nice body with a undercoat of black.

I have a couple of questions: can I leave the lacquer on under the new paints? Do I need to use a two part putty to do the minor flaws such as pinholes, large scratches, etc.....? Speaking of scratches: I seem to have made more large scratches in some areas than I should around the area I was working so I will need to repair them as they all show up. What grades to start with and finish before primer and what grades to start and finish after primer.

Thank you in advance,

WEK.:freak:
 
Last edited:

TAZ

Administrator
Staff member
Well, you can leave the lacquer on there if you plan on painting with lacquer. It sounds like you are.
I am using lacquer so it will spot in pretty easily.

Lacquer does not harden, so you probably shouldn't have painted it if you are painting an epoxy primer over this to repair areas.
Sounds like you are painting the car, then working your way backwards.
You can use the 2 part putty as long as you don't apply if over the lacquer.
In fact, I wouldn't suggest applying anything that's catalyzed over the black lacquer.

If you are asking what grades 'of sandpaper', you can finish in 180 before painting and I'd suggest anything finer than 320.
 

skullandbones

New member
Hi Taz,

You're right. I am working backwards to a certain extent. However, I was no going to put anything over the lacquer (remove a section and do body work and then repaint). I needed to know if I could leave the lacquer on and paint over it with PPG, Sherman Williams, etc.... If the answer is no, I guess I will have to sand it down and seal it before the base coat of the new paint. I am prepared to do that if necessary.

So to restate: My plan is to have the body work completed with a coat of black lacquer over it after reworking the areas with flaws. I didn't want a black car but did want to have the black undercoat as a uniform background for my basecoat. It all depends on what advice you give as to how much extra work I will incur. If I have to remove the lacquer, I will still want a black undercoat for the base coat if I choose to do silver base or use the black as a base coat if I decide to go with a different color scheme.

1) two stage silver and then candy coat. That's the one I want to have the black undercoat.

2) black base coat, clear with metallic, and then candy coat.

Those are the two plans I have to date. I am leaning toward the 2nd one even though it will probably be more challenging.


Thanks you,

WEK.
 

TAZ

Administrator
Staff member
If you absolutely have to use a black under the silver, I would suggest using a black 'basecoat', not a lacquer.

Then you can spray the silver basecoat, then the candy
You may have a bit of a tough time getting the silver to cover that black though.

I think the second one would actually be easier for you.
 

skullandbones

New member
Basecoat

So it looks like that will point me toward what I have heard called "Black Cherry" in the past. I was at the Huntington Beach Cruise In for Factory Five Racing this weekend and there was a roadster there that had exactly what I described in 2). It didn't show very much metallic through the candy coat but had various looks in different lights from black to burgundy metallic.

So are you saying to remove the lacquer when I have finished using it as the "guide coat"? Also, do I need to get every bit of it off or should I sand it down and seal it to protect the basecoat? What specifically would be the best product and process? I'm not averse to labor so give me your best shot! It won't hurt my feelings.

Thank you,

WEK.
 

TAZ

Administrator
Staff member
Well, I'm not for sure the best way to remove the lacquer. I really don't know how thick or coarse the paint is.
I would think that it would be best just to 'sand' it off.
BUT, you can paint over the lacquer if you want, but it's just not the way it's supposed to be done. I don't think you would have any problems with it.

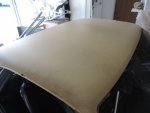
Really a 'guide coat' is just a very light coat that goes over the primer, just to be used as a guide.
Like shown on this roof

25_roof_primed.jpg

As far as a black base with metallic over it, then candy. This really won't give you a black cherry look. This will be black, but will sparkle when the sun hits it. If you want more of a black cherry, a charcoal metallic base will need to be painted before the candy
 

skullandbones

New member
Taz,

I really appreciate your input. I will eventually get to a point where I am pleased with the curves on the roadster and the surface smoothness. When I'm ready, I will sand down the black and seal. Thanks for the heads up on the black cherry. I'm not sure exactly what I like best of the various iterations of the black and candy apple combinations. As the time gets closer for me to make that final decision, I think it will be easier now knowing some of the subtle differences in the paints schemes.

Thanks again,

WEK.
 

TAZ

Administrator
Staff member
No problem...just be sure and do test panels before the real deal :bigokay:
 

skullandbones

New member
Excellent suggestion on the test panel. I come from a clinical laboratory testing background so I know that every test we did was like an experiment. You have to have a control! So I will use this analogy in my painting "experiments" by using a control test panel. Lots easier to do that than screw up the real thing!!! Thanks again,

WEK.
 

TAZ

Administrator
Staff member
Yep, you got that right.
You can usually get small 'test panels' or spray out cards from where you are getting your paint.
if you want bigger panels, you can go to a metal fab shop and have them cut you like 12x12 panels.
 

chopolds

Member
Getting to this thread pretty late, had hand surgery, can't function well!
You can just keep the car in lacquer, even candy it, hell that's the way we used to do it up to 20 years ago or so. If you can't find real candy lacquer, you can use Hose of Kolor's candy concentrates in clear lacquer to make them.
But practically, it won't hold up as well as modern urethanes. Esp. over fiberglass. But I'd recommend removing almost all of it while sanding, before putting on modern paints. Lacquer sands off pretty easily.
As for a nice black cherry look, try these: Candy red, brandywine or burgundy, even wild cherry, over: Black pearl (subtle look), Galaxy Gray (more metallic look), 1/2 and 1/2 Galaxy Gray and black (darker, but still sparkle) or black metalflake (the most sparkly finish). I even did a Mustang in 1/2 black pearl, and 1/2 black for a super subtle look. All that matters is what YOU like! Oh...and HOK has 2 different bases, a coarse metallic (BC code) and finer metallic (FBC code) It does make a difference.
 

skullandbones

New member
This pretty cool! I am a ways off from painting but it will be invaluable to not have to research as much from scratch. I have a paint supply store who does Sherman Williams. I think they are exclusively SW. I got my black lacquer from O'Rileys which is Duplicolor. Surprised the heck out of me that lacquer was available at all. So that's why I wanted to do a check coat with the lacquer since I knew it was coming off sooner or later anyway. It's also the only type I've ever painted except rattle cans. They do have candy apple red and green. They also have clear metallic. I was thinking of doing a clear coat with diamond dust at one point but can't even find that product. It's either not being used or I'm looking in the wrong places. As you can see I'm still somewhat up in the air for exact paint schemes but it has got to be 2 or 3 stage to satisfy me. Thanks for your input Mark.

I'm hoping to get more posts from the community to see just to learn more. I suppose it is clear that the lacquer will have to come off if I don't continue with that as a paint job with candy and clear. I experienced orange peal with the black so I don't know if the clear would be as tough to smooth out in the cut and polish phase. This is going to be a garaged car completely so I think the lacquer would last as long as it need to as I will probably get tired of it and want something different anyway.

Just to make certain I have it right, one more question: If I sand the lacquer down after finishing the last phase of the body work will it be acceptable to use the primer I am using as the only coat between the sanded lacquer and the modern paint? The primer I am using is Advantage, high solids acrylic lacquer primer. I don't know if this is what I should use under the urethane or not. I was told it is a good as an all around primer and surfacer. I am hoping that once I get it back to that point, I would do a quick check with gude coat to see if I had missed any small spots and then go for it. Suggestions.

I will post another thread when I get closer to the paint job to discuss the clear/color coats. I have heard them called "glaze coats" as they are somewhat translucent but not completely clear. As I understand it, you start with 70/30 then 50/50 then 30/70 and then clear to get a very deep looking effect. At least, that's what I have seen on the various web sources and videos. That would be a lot of paint but worth it if you get that 3 foot deep look.

So far I feel a lot better with your's and TAZs comments. Thanks, WEK.
 
Last edited:

chopolds

Member
Cars were painted in lacquer for over 50 years, so it can be a relatively durable paint. Just needs more care than today's harder finishes. You can get many different colors and clears from different suppliers for antique cars, like BIll Hirsch and Hibernia Restoration, and many others.
Now, most painters will tell you NOT to paint modern catalyzed finished over lacquer, there are good reasons not to. Lacquer air dries, and continues to release solvents and shrink, even after months of drying. It is not a chemically hard finish, so putting a tough hard shell ( modern catalyzed paint) over it can cause problems, such as solvent popping, and delamination. This includes putting urethanes over lacquer primer. I know people have don it and short term it might be successful, but you are taking a chance.
That said, on the other hand, back in the day, they DID actually make clear finishes that were supposedly made to go over lacquer paint. I remember an acrylic enamel (Centari) being marketed like that (580-S?), as well as "2K clears", which I believe were urethane clears to go over lacquer. My mentor and teacher of custom painting used to put Imron, polyurethane clear, over custom painted motorcycle parts, and race cars, for durability and ability to withstand fuel spills. I can't vouch for longevity, but they did look good and hold up well short term.
Glaze coats, I used to do myself, that is the trick I mentioned before, in making modern basecoats look more glamorous, or like the old lacquers. But you cannot do it the old way, you have to use much less base in the clear. If not the metallics will mottle and sag on you. For this you'll have to experiment with whatever material you are using, as different manufacturers use different reduction ratios, different solids content, etc. Solid color urethanes you can do this, as long as you use the same hardener in the color, as you do in the clear.
 

chopolds

Member
Oh...you can also still get lacquers from guitar places, furniture refinishers, and other sources, the only problem is getting the correct thinners for doing the paining at different temperatures, or if it's humid out (better not to do it, but have to use a retarder to slow dry time, if you do)
 

skullandbones

New member
You know, there's a lot to be said for lacquers. I didn't think about the nostalgic market and antique car guys. I guess if you are a purist, lacquer would have to go back on that antique just like it came from the factory. If I could dial the mixture in so I could get the stuff to lay down flat and wet enough, I might still do it with lacquer. But so far that has not been the case. I have very dry conditions here in AZ and the heat can be an issue too (atomized paint dries way too fast). But I have only tried painting the black twice. The first time I didn't have my compressor set up the way I wanted it and didn't reduce the paint at all. Orange peel was terrible. I cut the heck out of it and compounded and still have a lot left. The second go around was better as I reduced my compressor pressure to 50 psi and stepped down at the gun to 22 psi. I held the gun closer (about 5 inches). The reducer I added to the Duplicolor premixed paint (ready to spray) did help a little. Then I misted the coat with a spray of reducer straight. There was a lot less orange peel. So if I could get that a little better, I might like to stay with the lacquer for the first real paint job. I could always do a redo later. I'm sure this is not going to be the last paint job on this car.
 

chopolds

Member
With your kind of heat, you really need the slow dry thinner, or add retarder to it to get it to flow. Also, not sure how good quality Duplicolor is. They are not noted, in general, for being high quality. Try TGP Global to see if they carry premium thinner or retarder.
 

skullandbones

New member
You are probably right about the quality of the paint. I was not impressed with it but it was my first attempt and it was easily accessible and local. I haven't painted in a while so I thought that the pre-mixed ready to paint paint was a good idea: not so much any more. I had to cut it some anyway so I should get better paint and custom dilute for what I need, I guess. BTW, I'm using Advantage 104 (UN1263) Slow Dry Acrylic Lacquer Thinner. Is that acceptable? Or should I stay with the paint and thinner from the same manufacturer? I have to admit that the Duplicolor concept hooked me so I can't blame anybody but me on that one.


Thank you,

WEK.
 

chopolds

Member
Any time you buy anything pre-mixed it is a compromise, not exactly what you really need. A good brand of paint and the proper thinner will work a world of difference. Don't know anything about your thinner, you'd have to look up the recommended temp range...there might even be a VERY slow thinner for the temps you are shooting at...or like I said, but some retarder, so you can add it as needed, as the temperatures rise, you can add more. Might even search Ebay or craigslist for older cans of good quality lacquer, black would be especially easy! IIRC, R-M double deep black was the deepest, purest black there was in lacquer, and I was usually a Dupont man.
 

TAZ

Administrator
Staff member
As soon as you open that pre-mixed can, then thinner will start evaporating. So your paint will end up getting thicker and thicker.
No big deal if you use it all at once, but if you don't, you'll still need some extra thinner to mix in with it.

Being premixed, it's probably a 'fast' reducer

I'm not for sure on that thinner either
 
Top